Atari Cartridge w/ 24-pin DIP Socket
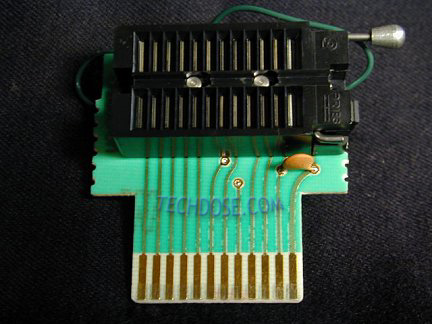 Front View |
 Back View |
Author: Wayne Eggert
Last Updated: 03/07/02
12/22/05
Note: I apologize ahead of time for the lack of
details or schematics as this was done in 2002 with some extra parts I
had laying around. As such there aren't any step-by-step instructions
and it's a pretty crude design, but it might give others some ideas so
I'm leaving it up here.
This is an Atari cartridge that has been modified with a 24-pin DIP (dual inline package) socket. I originally intended on using this for experimenting with Atari programming and burning some homemade games. After purchasing several desoldering tools, I finally found a worthwhile one at Radio Shack and it cut down considerably on the time invested on taking the old chip out of the Atari cartridge. I then just soldered in the new ZIF (zero insertion force) 24-pin DIP socket and then tested it with the old chip to make sure everything was still in working order. That was the easy part -- following soldering the socket in, I cut several traces on the board and soldered a hex inverter in so that I could then use a 2532 eprom with the board. I tested the cartridge several times and was able to get it working with the 2532 eprom relatively easily :) It successfully loaded up a Kaboom! rom I burned onto the eprom just fine.
I had two days to play around with this "hack" a bit more before having to head back to college and decided I'd see if I could get it working with 2732 eproms (and still have compatibility with 2532 eproms). You see, 2532 eproms are a bit more expensive (around $3ea new from an electronic store online, or $1-$2.00ea used). The 2732 eproms, on the other hand, are roughly $1.50ea or so new and $0.50ea used. So I figure it would be in my best interest to be able to test either eproms in this device.
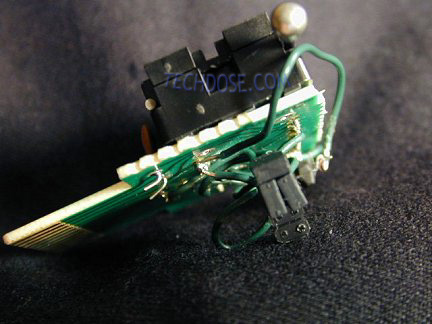
The 2732 eprom differs slightly from the 2532 eprom, but only in that 3 of the pins are switched around. My original thoughts were to implement some sort of on/off type of switch, so I could control how the pins were being switched around -- but I quickly dismissed this idea b/c I don't have any on/off switches available and it would make the cartridge considerably bulkier. It was at this time I remembered I had an old ISA I/O Controller card that I had previously used to practice soldering on for a Playstation mod. This card had a ton of jumpers on it and if I could salvage some off the board, it would be a great way of switching between the two types of eproms. The first revision involved roughly 10 or 12 of the jumper pins being used (ie 5 or 6 jumpers having to be switched around). Without having a breadboard to mount them on, it proved a clumbsy way of doing things considering each of those jumper pins would need a wire. Another caveat was that whenever a jumper was placed on the pins, it usually pushed the pins out the opposite direction. So I got a piece of paper out and started drawing how pins were being routed & how I'd need to route them for the 2732 eprom support -- eventually I cut it down to 6 pins (3 jumpers). Needless to say, I cut a few more traces on the board and began re-soldering to my new specification.
|
Here is a closer shot of the jumpers I'm currently using. As you can see, this isn't the prettiest way of doing things, but it gets the job done for testing the design. To make it look somewhat nice, DIP switches would probably be the way to go, but I'm not going to worry about that until after the jumpers are working as they should. |
After half an hour or so, I set the jumpers for the 2532 eprom configuration and was ready to test things -- there were no signs of life. I took a look again at my drawing and noticed a mistake, fixed it and again tested -- success! Well, at least on getting the 2532 eproms working once again. I then switched the jumpers around to the 2732 eprom configuration and tested the cartridge -- no signs of life. For the remainder of the night, and a large part of the afternoon the following day, I began retracing my original thoughts and could not for the life of me find any mistakes. I even tested the cartridge with a multimeter and all the readings indicated pins were being routed correctly. Sadly, I had to head back out to college before I was able to figure out what had gone wrong. I think what I may do is sacrifice one of the 2732 eproms and solder it in a fresh Atari 2600 cartridge and get it working there first, then carry it over to my previous project. I'll update this page as soon as that happens, and hopefully try to explain things step by step as soon as I get a working eprom cart!
What the F#&% is this for?
Ok, ok.. so you still might be thinking "What on Gods green Earth is this thing?" It's what's inside an Atari cartridge -- yes, inside that plastic casing is a green PCB (Printed Circuit Board). This was formally a Commando Raid cartridge. I have so freggin' many of these Commando Raid cartridges, I figured it would be best suited as a test subject b/c if I screwed one up, I could just pull out another and start over. I'm not the first person crazy enough to want to do this.. really!! In fact, back when Atari was popular, a lot of game pirating went on this way. Instead of buying a $30 or $40 Atari game, some people programmed their own eproms and could reprogram them whenever they wanted a different selection of games. But, that's not my purpose for the cartridge (nor is it for most people today). I plan to muck around with some Atari programming and possibly make some cartridges to sell on Console Classics (homebrew ones). I figured it was also a decent way of getting back into the groove of electronics/soldering.
Atari Programming Overview
You might wonder why ANYONE in their right mind would even consider
programming for a console that's over 20 years old. It's quite simple
really -- I'm not in my right mind ;-) What's interesting tho is that
the Atari console is a challenge to program for, with the limit in game
size being only 2k or 4k and it's lack of cpu power and memory. Games
are programmed in assembly language for the 6502 processor that's
inside the Atari. I plan to do some simple graphical output first, then
see where that takes me. I doubt I'll be getting too involved with it,
just kinda as a side project and to learn some more about assembly/game
programming. For more information on programming for the Atari 2600,
I've included some links below.
Atari Programming Links:
- Nick Bensema's Homepage - Atari programming tools, disassembled games, homebrew games.
Comments:
No comments have yet been made.